Explore LLM using LangChain and HuggingFace
Relevant Sites
- LangChain v0.2 Doc
- LangChain Github
- Download HuggingFace Model
- HuggingFace - Microsoft/Phi-3-mini-4k-instruct
- Blog - HuggingFace LangChain Partner Package
- HuggingFace - TinyLlama/TinyLlama-1.1B-Chat-v1.0
- HuggingFace - TinyLlama/TinyLlama_v1.1
- HuggingFace - TinyLlama/TinyLlama_v1.1_chinese
- HuggingFace Discussion - LLaMA 7B GPU Memory Requirement
- HuggingFace - Download Modesl
- LangChain - Chatbot
- LangChain - Conversational RAG
- LangChain - Build a Retrieval Augmented Generation (RAG) App
- LangChain - Chroma (Vector Store)
- LangChain - Vector Stores
- HuggingFace - Qwen/Qwen-1_8B-Chat-Int4
- Github - QwenLM/Qwen
- Gist CurtisNewbie - Qwen/Qwen-1_8B-Chat-Int4 Demo
- HuggingFace - 4bit Quantization
- HuggingFace - bitsandbytes for Quantization
- LangChain - Vector store-backed retriever
- Private GPT
Getting Started
Install langchain
python3 -m pip install langchain
Setup langsmith (https://smith.langchain.com/), but it’s not really needed, we may well just skip this.
export LANGCHAIN_TRACING_V2="true"
export LANGCHAIN_API_KEY="..."
Use LangChain with HuggingFace
- https://python.langchain.com/v0.2/docs/integrations/platforms/huggingface/
python3 -m pip install langchain-huggingface
python3 -m pip install --upgrade --quiet  transformers --quiet
Load the HuggingFace model locally (TinyLlama/TinyLlama-1.1B-Chat-v1.0), it’s a 1.1b model, I am running it on Macbook Pro M2 16GB. My laptop cannot handle Model with over 3b parameters.
from langchain_huggingface import HuggingFacePipeline

hf = HuggingFacePipeline.from_model_id(
    model_id="TinyLlama/TinyLlama-1.1B-Chat-v1.0",
    task="text-generation",
    pipeline_kwargs={"max_new_tokens": 150},
)
Task is what the model can handle. In this case, we are using a text-generation model. Which task should we specify depends on what we are doing, a model may be capable of multiple tasks.

Searching models based on tasks on HuggingFace.
Create Prompt Template (will get much better response):
from langchain_core.prompts import PromptTemplate

# prompt template
template = """Question: {question}

Answer: Let's think step by step."""
prompt = PromptTemplate.from_template(template)

# bind local langchain to the prompt
chain = prompt | hf.bind()

q = "How to brew coffee?"
print(chain.invoke({"question": q}))
We can also invoke the model directly without PromptTemplate, but the response is worse:
print(hf.invoke("How to brew coffee?"))
A working example is available at: github.com/CurtisNewbie/llm_stuff/blob/main/tinyllama.py
from langchain_core.prompts import PromptTemplate
import sys
import readline
from langchain_huggingface import HuggingFacePipeline

hf = HuggingFacePipeline.from_model_id(
    model_id="TinyLlama/TinyLlama-1.1B-Chat-v1.0",
    task="text-generation",
    pipeline_kwargs={
        "max_new_tokens": 150,
    },
    model_kwargs={
        "temperature": 0.7,
        "top_k": 50,
        "top_p": 0.95,
        "do_sample": True,
    },
)

template = """Question: {question}

Answer: Let's think step by step."""
prompt = PromptTemplate.from_template(template)

chain = prompt | hf.bind()

while True:
    try:
        print("Enter your question:")
        q = sys.stdin.readline().strip()
        if not q: continue
        resp = chain.invoke({"question": q})
        print(f"\n\n> model: '{resp}'\n")

    except InterruptedError:
        sys.exit()
    except Exception as e:
        print(f"Exception caught {e}")
If the model supports streaming, we can change the code like the following. If the model doesn’t support streaming then the method call is simply blocked returning only one single chunk:
for chunk in chain.stream({"question": q}):
    print(chunk, flush=True)
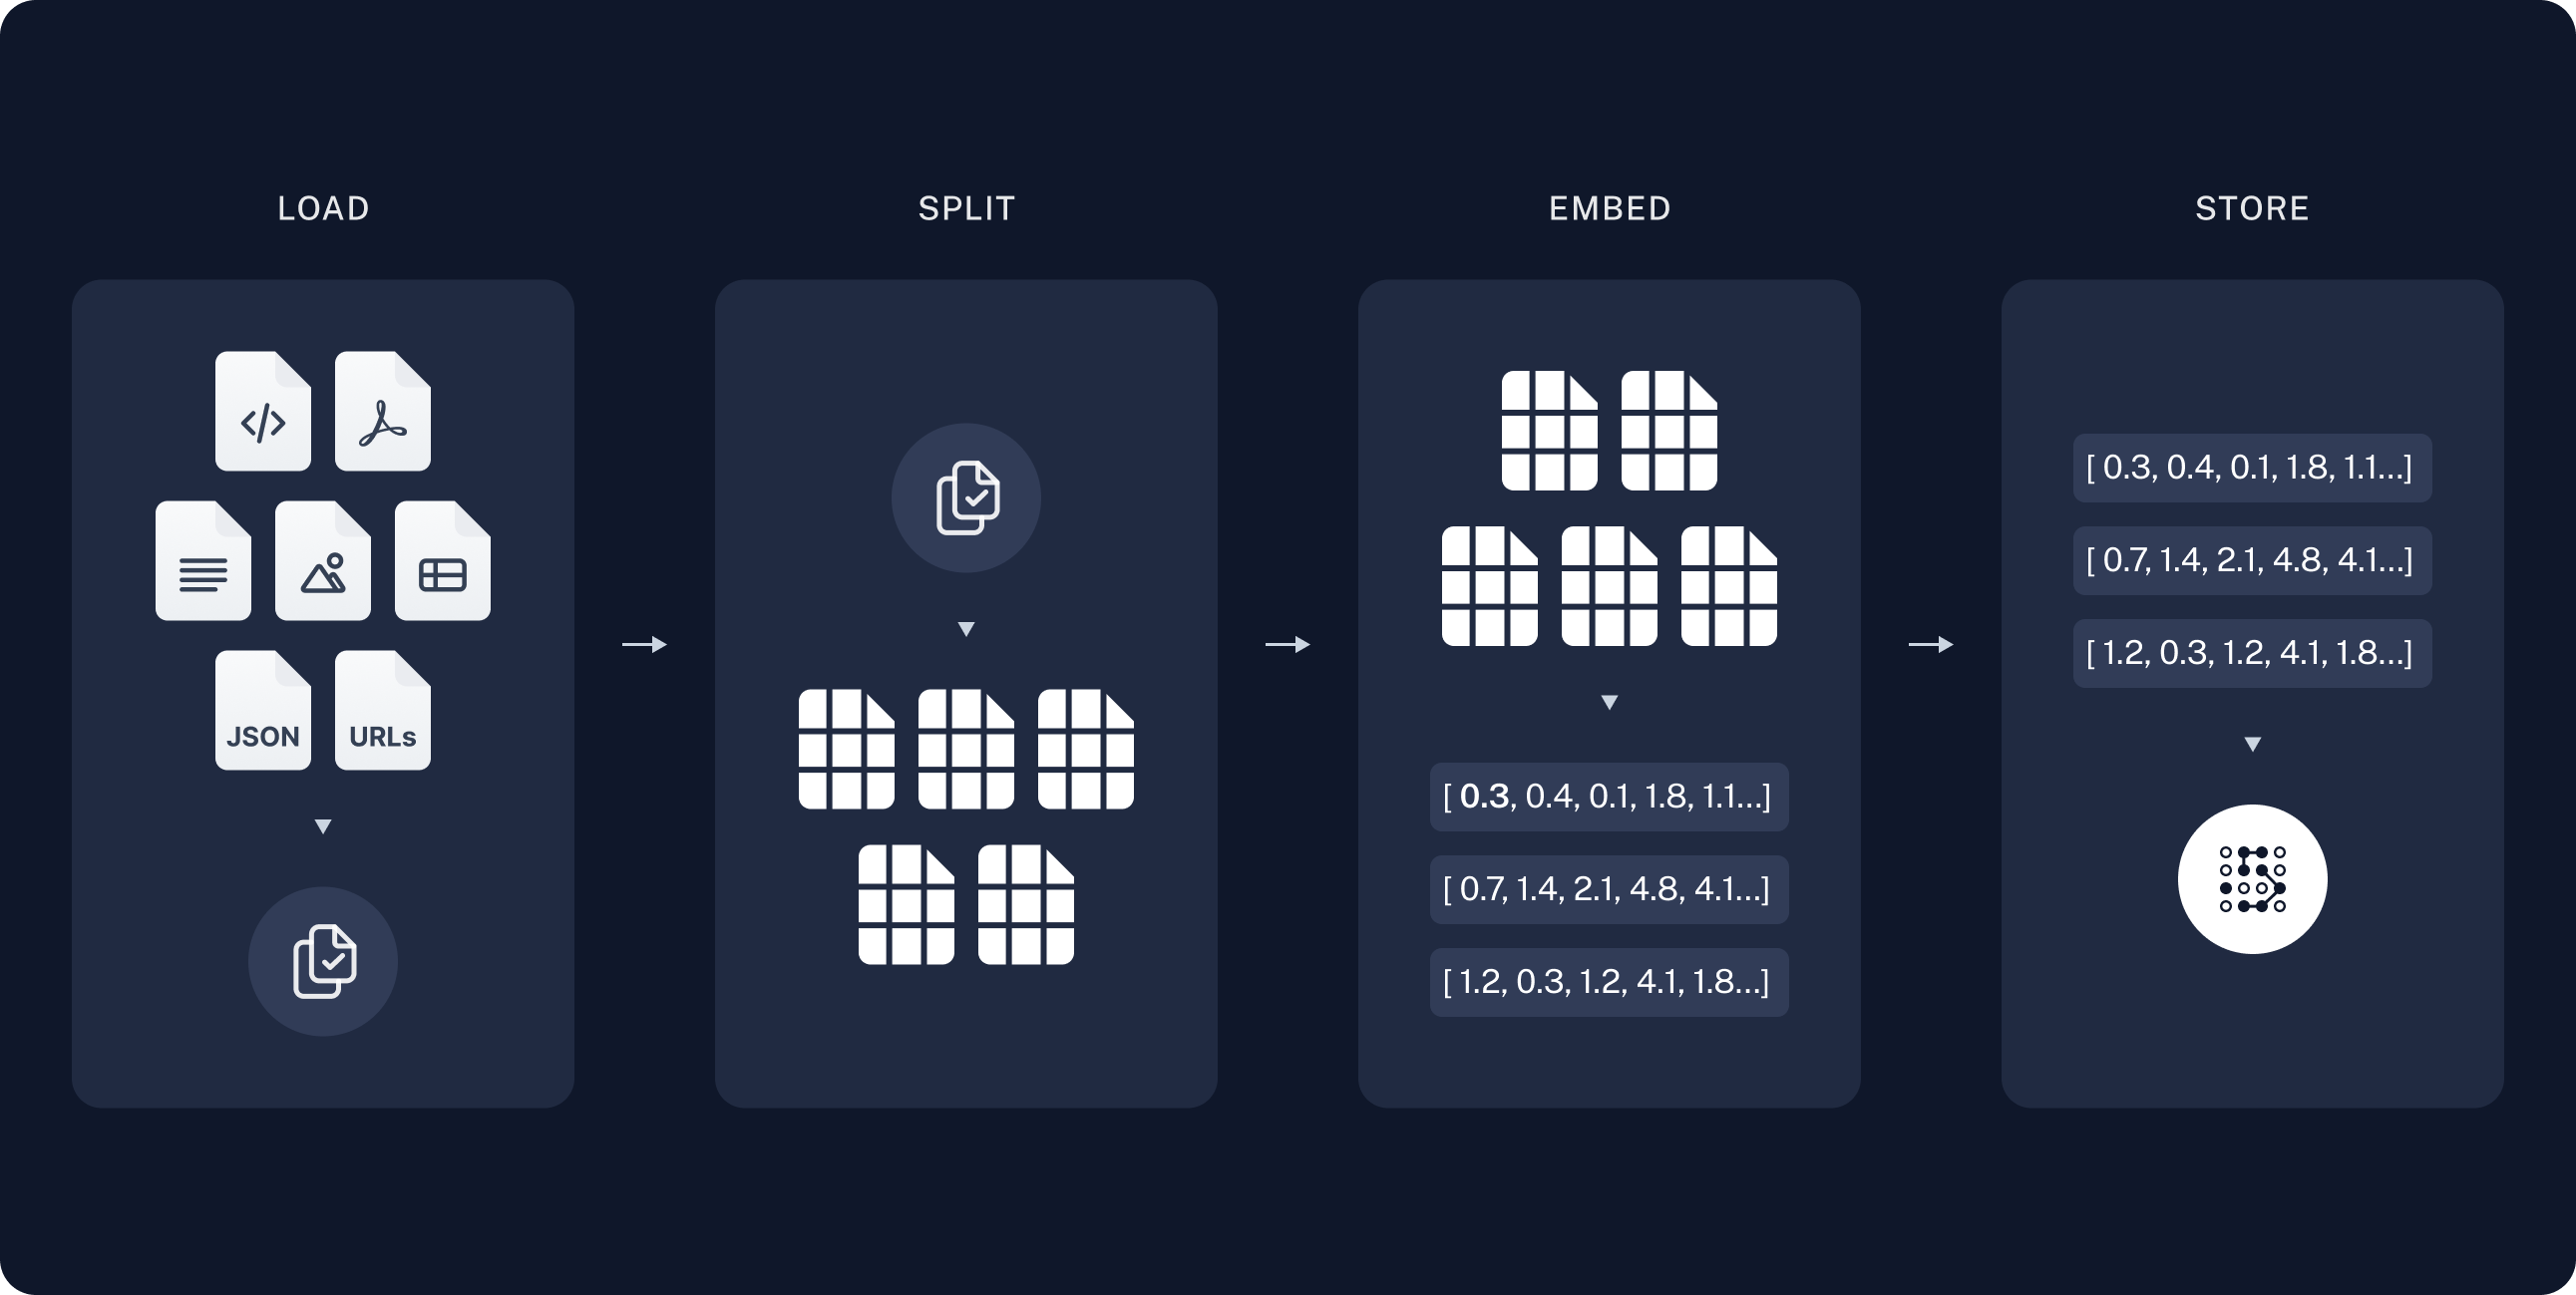
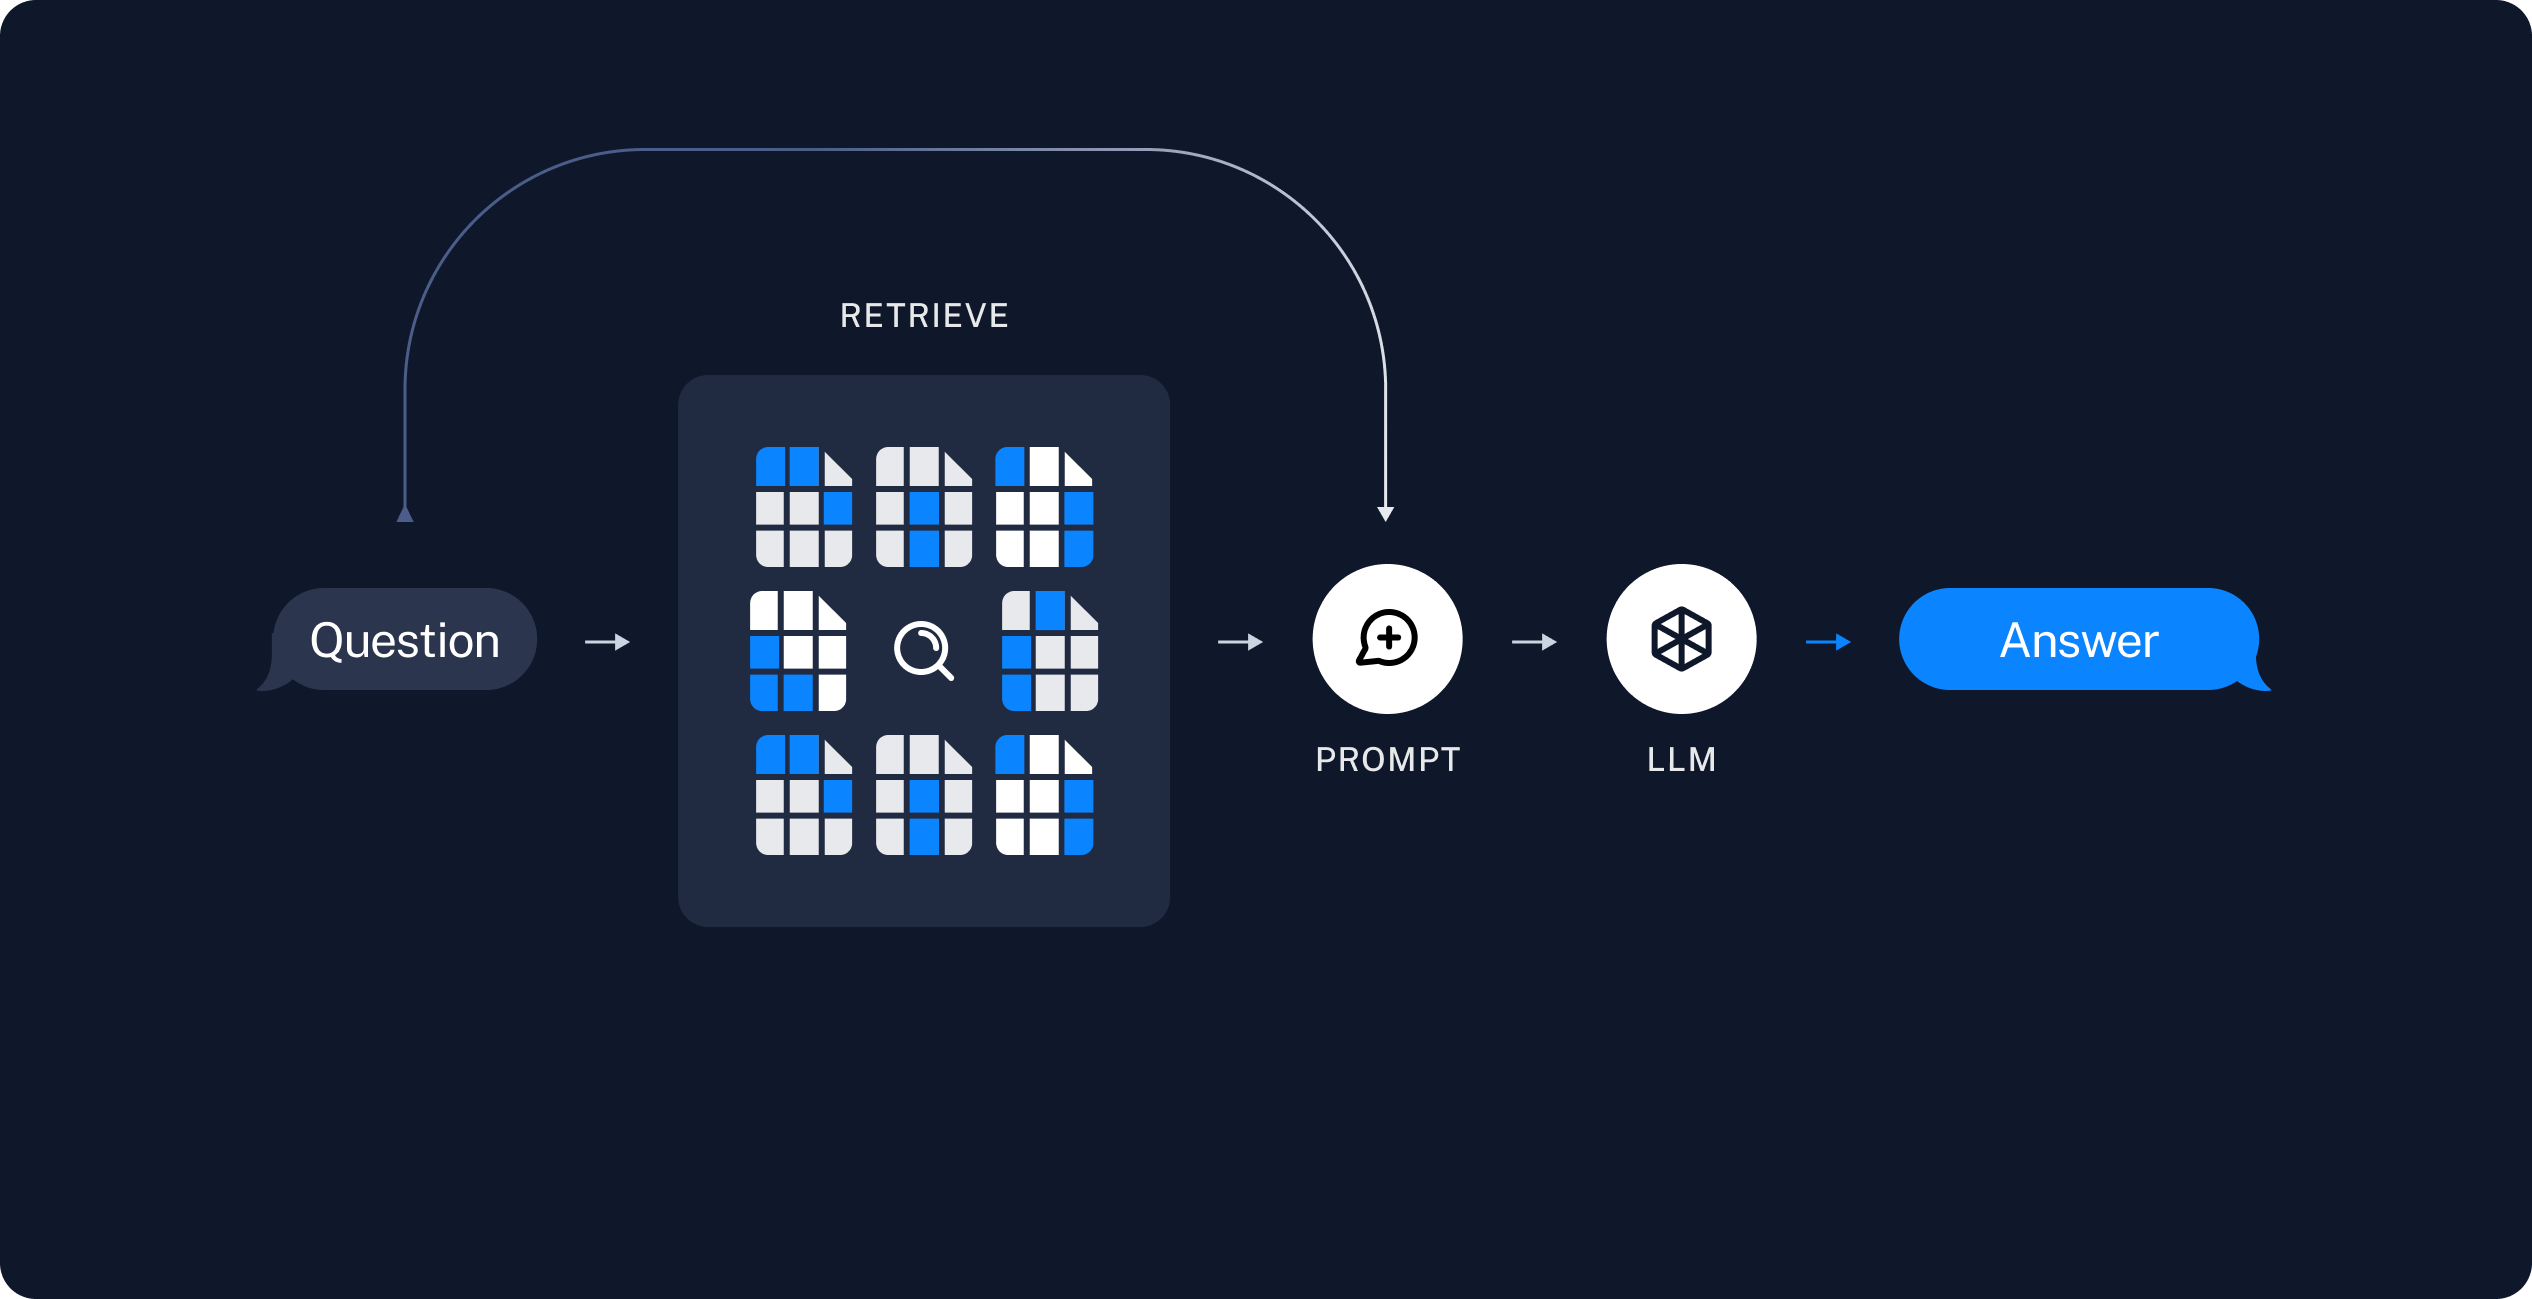
Retrieval Augmented Generation (RAG)
RAG is a way to connect LLM model with external sources. In LangChain’s RAG tutorial, an OpenAI model is used and connected to a online document parsed using bs4.
In essence, RAG involves indexing the data (documents), storing the indexes in vector database, retrieving the context from the vector database (based on similarity, i.e., Similarity Search) for the question, and finally adding the context to the prompt that is passed to the LLM model.
The following images are from LangChain.
Install relevant dependencies. Chroma is a vector database.
python3 -m pip install langchain langchain_community langchain_chroma
First of all, we create a LangChain pipeline for the model:
from langchain_core.prompts import PromptTemplate
import re
import traceback
import sys
import readline
from langchain_huggingface import HuggingFacePipeline

max_new_tokens=300
task="text-generation"
model="TinyLlama/TinyLlama-1.1B-Chat-v1.0"

hf = HuggingFacePipeline.from_model_id(
    model_id=model,
    task=task,
    pipeline_kwargs={
        "max_new_tokens": max_new_tokens,
    },
    model_kwargs={
        "temperature": 0.7,
        "top_k": 50,
        "top_p": 0.95,
        "do_sample": True,
    },
)
Import DocumentLoader to load external documents. Import Splitter to break documents into chunks. Import Embeddings to create a vector representation of text that is stored in a vector database.
In the following code, the retriever is created from the vector database. Retriever is simply a concept that accepts a string query and returns a list of documents, in this case, it’s doing similarity search based on the question asked.
from langchain_chroma import Chroma
from langchain_community.document_loaders import TextLoader
from langchain_text_splitters import CharacterTextSplitter
from langchain_huggingface import HuggingFaceEmbeddings
from langchain_core.runnables import RunnablePassthrough

# load the local document
files = ["about_onecafe.txt"]
documents = []
for f in files: documents.extend(TextLoader(f).load())

# split documents into chunks
text_splitter = CharacterTextSplitter(chunk_size=1000, chunk_overlap=0)
docs = text_splitter.split_documents(documents)

# create Embedding function to convert each piece of text to vector
embed = HuggingFaceEmbeddings()

# store documents into Chroma (in memory)
vec = Chroma.from_documents(docs, embed)

# create retriever from the vector database
retriever = vec.as_retriever(search_kwargs={"k": 1}) # default: k is 4
With all the Loader, Splitter, Embeddings, Vector Database and Retriever setup, we can construct a chain that automatically complete the context for the LLM model.
The prompt template is slightly different, it now contains a context section for the LLM model (It’s copied from LangSmith). The content of {context} actually comes from the vector database using the Retriever that we just created.
The RunnablePassthrough() does nothing, it just passes the query to {question} section.
def format_docs(docs):
    return "\n\n".join(doc.page_content for doc in docs)

template = """You are an assistant for question-answering tasks. Use the following pieces of retrieved context to answer the question. If you don't know the answer, just say that you don't know. Use three sentences maximum and keep the answer concise.

Question: {question}

Context: {context}

Answer:"""
prompt = PromptTemplate.from_template(template)

chain = (
    {"context": retriever | format_docs, "question": RunnablePassthrough()}
    | prompt
    | hf.bind()
)
Finally, we just invoke the chain with our question:
print(chain.invoke("What is LLM model?"))
A working example is available at: github.com/CurtisNewbie/llm_stuff/blob/main/tinyllama_rag.py
from langchain_core.prompts import PromptTemplate
import re
import traceback
import sys
import readline
from langchain_huggingface import HuggingFacePipeline

max_new_tokens=300
task="text-generation"
model="TinyLlama/TinyLlama-1.1B-Chat-v1.0"

hf = HuggingFacePipeline.from_model_id(
    model_id=model,
    task=task,
    pipeline_kwargs={
        "max_new_tokens": max_new_tokens,
    },
    model_kwargs={
        "temperature": 0.7,
        "top_k": 50,
        "top_p": 0.95,
        "do_sample": True,
    },
)

from langchain_chroma import Chroma
from langchain_community.document_loaders import TextLoader
from langchain_text_splitters import CharacterTextSplitter
from langchain_huggingface import HuggingFaceEmbeddings
from langchain_core.runnables import RunnablePassthrough

# load the document and split it into chunks
files = ["about_onecafe.txt"]
documents = []
for f in files:
    documents.extend(TextLoader(f).load())

# split it into chunks
text_splitter = CharacterTextSplitter(chunk_size=1000, chunk_overlap=0)
docs = text_splitter.split_documents(documents)

# create the open-source embedding function (also a model)
embed = HuggingFaceEmbeddings()

# load it into Chroma
vec = Chroma.from_documents(docs, embed)
reti = vec.as_retriever(search_kwargs={"k": 1}) # default: k is 4

def format_docs(docs):
    return "\n\n".join(doc.page_content for doc in docs)

template = """You are an assistant for question-answering tasks. Use the following pieces of retrieved context to answer the question. If you don't know the answer, just say that you don't know. Use three sentences maximum and keep the answer concise.

Question: {question}

Context: {context}

Answer:"""
prompt = PromptTemplate.from_template(template)

chain = (
    {"context": reti | format_docs, "question": RunnablePassthrough()}
    | prompt
    | hf.bind()
)

print(chain.invoke("Tell me about onecafe"))
Quantization
With Quantization (e.g., 4bit), we can reduce the usage of memory, making LLM runs faster. Some models on HuggingFace have already done it without extra configuration, but those may require CUDA support.
Quantization only works on GPU (kinda), include load_in_4bit=True and device_map=auto to enable the quantization, but model should support it in the first place.
Quantization needs bitsandbytes:
python3 -m pip install bitsandbytes
When we create the model, include the args mentioned above:
hf = HuggingFacePipeline.from_model_id(
    model_id=model,
    task=task,
    pipeline_kwargs={
        "max_new_tokens": max_new_tokens,
    },
    model_kwargs={
        "temperature": 0.7,
        "top_k": 50,
        "top_p": 0.95,
        "do_sample": True,
        "load_in_4bit": True, # 4bit quantization
        "device_map":"auto",
    },
)
Demo - Deploy LLM Model on CentOS with GPU
This section roughly documents how I setup CUDA and all sort of dependencies to run the LLM Model: Qwen/Qwen2-7B-Instruct on CentOS
(the setup is roughly the same even if you change to another LLM model).
The python code is available in repo: https://github.com/CurtisNewbie/llm_stuff/tree/main/qwen2_deploy
You may follow other official guides, e.g., to install Pytorch properly using venv, conda or something else.
- https://pytorch.org/get-started/previous-versions/
Install nvidia driver, after the installation, check your GPU status using nvidia-smi command:
nvidia-smi

# *** ***  * **:**:** 2024
# +---------------------------------------------------------------------------------------+
# | NVIDIA-SMI 535.154.05             Driver Version: 535.154.05   CUDA Version: 12.2     |
# |-----------------------------------------+----------------------+----------------------+
# | GPU  Name                 Persistence-M | Bus-Id        Disp.A | Volatile Uncorr. ECC |
# | Fan  Temp   Perf          Pwr:Usage/Cap |         Memory-Usage | GPU-Util  Compute M. |
# |                                         |                      |               MIG M. |
# |=========================================+======================+======================|
# |   0  NVIDIA A10                     On  | 00000000:00:07.0 Off |                    0 |
# |  0%   26C    P8               8W / 150W |      0MiB / 23028MiB |      0%      Default |
# |                                         |                      |                  N/A |
# +-----------------------------------------+----------------------+----------------------+

# +---------------------------------------------------------------------------------------+
# | Processes:                                                                            |
# |  GPU   GI   CI        PID   Type   Process name                            GPU Memory |
# |        ID   ID                                                             Usage      |
# |=======================================================================================|
# |  No running processes found                                                           |
# +---------------------------------------------------------------------------------------+
The output above shows that we have a Nvidia A10 GPU installed with 23GB of VRAM available. Notice that even though the output of nvidia-smi shows CUDA Version: 12.2, it’s merely a compatible driver version.
If you don’t have CUDA already, install CUDA toolkit instead of CUDA. CUDA is included in CUDA toolkit. Notice that we are using CUDA12.1, we should make sure that all relavent cuda dependencies support exactly CUDA 12.1.
- Nvidia CUDA Toolkit 12.0 Downloads
- Nvidia CUDA Toolkit Release Notes
- Nvidia rhel7/x86_64 CUDA Repo Index
Since we are using CentOS, we use yum package manager. In the above Nvidia websites: select your OS, architecture and distribution; copy paste the generated installation instructions:
(it seems like you don’t actually need nvidia-driver-latest-dkms, the commands below are exactly what I did anyway).
# Add cuda repo config
sudo yum-config-manager --add-repo https://developer.download.nvidia.com/compute/cuda/repos/rhel7/x86_64/cuda-rhel7.repo

# clean cache
sudo yum clean all

# install cuda toolkit, cuda is included
sudo yum -y install cuda-toolkit
Check that we have nvcc installed, nvcc is Nvidia CUDA Compiler Driver, it should be automatically installed as part of the CUDA toolkit.
- https://docs.nvidia.com/cuda/cuda-compiler-driver-nvcc/
nvcc --version
# nvcc: NVIDIA (R) Cuda compiler driver
# Copyright (c) 2005-2023 NVIDIA Corporation
# Built on Mon_Apr__3_17:16:06_PDT_2023
# Cuda compilation tools, release 12.1, V12.1.105
# Build cuda_12.1.r12.1/compiler.32688072_0
Install nccl library. nccl is NVIDIA Collective Communications Library. PyTorch will attempt to open these *.so.* lib files provided by nccl.
Update in 2025: you don’t need to manually install libnccl, just setup $LD_LIBRARY_PATH (See Potential Issues Section).
# Add cuda repo config (same repo)
sudo yum-config-manager --add-repo https://developer.download.nvidia.com/compute/cuda/repos/rhel7/x86_64/cuda-rhel7.repo

# Install libnccl for cuda12.1 (NOT NEEDED)
yum install libnccl-2.18.3-1+cuda12.1

yum list installed | grep nccl
# libnccl.x86_64                                     2.18.3-1+cuda12.1                   @cuda-rhel7-x86_64
Have a look at cuda lib location, it should be located at /usr/local
ls -l /usr/local/ | grep cuda
# lrwxrwxrwx   1 root root   21 Jun 28 15:15 cuda -> /usr/local/cuda-12.1/
# drwxr-xr-x  17 root root 4096 Jun 28 15:16 cuda-12.1
Install python3.11 (or later versions):
yum install python3.11
python3.11 -m ensurepip
As shown below, I wrote two python scripts: one is for loading documents to Qdrant (vector database), another one is for bootstraping the RAG LLM model to server QA queries. (The model used in this example: huggingface.co/Qwen/Qwen2-7B-Instruct)
llm.py
# ...
collection_name = "documents"
embedding_name = "sentence-transformers/distiluse-base-multilingual-cased-v1"
max_new_tokens = 300
task = "text-generation"
model = "Qwen/Qwen2-7B-Instruct"
cache_path = "/root/qdrant_cache"

hf = HuggingFacePipeline.from_model_id(
    model_id=model,
    task=task,
    pipeline_kwargs={
        "max_new_tokens": max_new_tokens,
    },
    model_kwargs={
        "temperature": 0.3,
        "top_k": 50,
        "top_p": 0.95,
        "do_sample": True,
        "load_in_4bit": True,
    },
)

embeddings = HuggingFaceEmbeddings(model_name=embedding_name)
vectorstore = Qdrant.from_existing_collection(
    embedding=embeddings,
    path=cache_path,
    collection_name=collection_name)

template = """...."""
retriever = vectorstore.as_retriever(search_type="similarity_score_threshold", search_kwargs={"score_threshold": 0.2})
prompt = PromptTemplate.from_template(template)
chain = (
    {"context": retriever | format_docs, "question": RunnablePassthrough()}
    | prompt
    | hf.bind()
)
print(chain.invoke("How is the weather today?"))
qdrant_load.py
# ...
collection_name = "documents"
embedding_name = "sentence-transformers/distiluse-base-multilingual-cased-v1"
cache_path = "/root/qdrant_cache"
base_dir = '/root/llm/files'
documents = []

for file in os.listdir(base_dir):
    file_path = os.path.join(base_dir, file)
    if file.endswith('.pdf'):
        documents.extend(PyPDFLoader(file_path).load())
    elif file.endswith('.docx'):
        documents.extend(Docx2txtLoader(file_path).load())
    elif file.endswith('.txt'):
        documents.extend(TextLoader(file_path).load())
print("Documents loaded")

text_splitter = RecursiveCharacterTextSplitter(chunk_size=200, chunk_overlap=10)
chunked_documents = text_splitter.split_documents(documents)
print("Documents splited")

embeddings = HuggingFaceEmbeddings(model_name=embedding_name, show_progress=True)
print("Embeddings loaded")

vectorstore = Qdrant.from_existing_collection(
    embedding=embeddings,
    path=cache_path,
    collection_name=collection_name)

vectorstore.add_documents(chunked_documents)
print("Documents added")
Install python dependencies:
python3.11 -m pip install langchain langchain-huggingface transformers bitsandbytes langchain-community langchain-qdrant accelerate
If everything goes right, we can use qdrant_load.py to load documents, and then we can use llm.py to load the RAG LLM Model to answer questions.
To create simple ChatUI, we can use gradio.
python3.11 -m pip install gradio
Change llm.py to use gradio to serve QA at 0.0.0.0:80:
import re
import gradio as gr

def predict(message, history):
    if not message:
        result = "Say something?"
    else:
        result = chain.invoke(message)
    yield result

gr.ChatInterface(predict).queue().launch(share=False, server_name="0.0.0.0", server_port=80)
Potential Issues
Updates in 2025 about libcupti.so.* files not found
LD_LIBRARY_PATH actually works, with env LD_LIBRARY_PATH properly set, you don’t need to manually install nccl.
E.g.,
[*** src]# find /usr/ -name "libnccl.so.2"
/usr/local/lib/python3.11/site-packages/nvidia/nccl/lib/libnccl.so.2

[*** src]# find /usr/ -name "libcupti.so.12"
/usr/local/cuda-12.4/extras/CUPTI/lib64/libcupti.so.12
/usr/local/lib/python3.11/site-packages/nvidia/cuda_cupti/lib/libcupti.so.12

export LD_LIBRARY_PATH="/usr/local/lib/python3.11/site-packages/nvidia/cuda_cupti/lib:/usr/local/lib/python3.11/site-packages/nvidia/nccl/lib:/usr/local/cuda-12.4:$LD_LIBRARY_PATH"

# check if pytorch works
[*** src]# python3.11 -c "import torch; print(torch.cuda.nccl.version())"
(2, 21, 5)
[*** src]# python3.11 -c "import torch; print(torch.cuda.is_available())"
True
1. PyTorch - ImportError: libcupti.so.12: cannot open shared object file: No such file or directory
...

Traceback (most recent call last):
  File "/usr/local/lib/python3.11/site-packages/langchain_huggingface/embeddings/huggingface.py", line 53, in __init__
    import sentence_transformers  # type: ignore[import]
    ^^^^^^^^^^^^^^^^^^^^^^^^^^^^
  File "/usr/local/lib/python3.11/site-packages/sentence_transformers/__init__.py", line 7, in <module>
    from sentence_transformers.cross_encoder.CrossEncoder import CrossEncoder
  File "/usr/local/lib/python3.11/site-packages/sentence_transformers/cross_encoder/__init__.py", line 1, in <module>
    from .CrossEncoder import CrossEncoder
  File "/usr/local/lib/python3.11/site-packages/sentence_transformers/cross_encoder/CrossEncoder.py", line 7, in <module>
    import torch
  File "/usr/local/lib64/python3.11/site-packages/torch/__init__.py", line 239, in <module>
    from torch._C import *  # noqa: F403
    ^^^^^^^^^^^^^^^^^^^^^^
ImportError: libcupti.so.12: cannot open shared object file: No such file or directory
This issue is actually caused by PyTorch. Notice that almost everything is built on top of PyTorch, and PyTorch internally communicates with Nvidia GPU using CUDA.
libcupti.so.12 is a lib file provided by CUDA.
The file may exist in your OS, but PyTorch somehow couldn’t find it. Use find to locate the lib file first:
sudo find / -name "libcupti.so.12"
# /usr/local/cuda-12.1/extras/CUPTI/lib64/libcupti.so.12
Create symbolic link to python3.11 package path so that PyTorch can correctly open the lib files:
mkdir -p /usr/local/lib64/python3.11/site-packages/nvidia/nccl/lib
ln -s /usr/local/cuda-12.1/extras/CUPTI/lib64 /usr/local/lib64/python3.11/site-packages/nvidia/nccl/lib

# just in case you want to remove the symlink:
# unlink  /usr/local/lib64/python3.11/site-packages/nvidia/nccl/lib
Before I tried the symlink approch, I did some research; some recommend setting LD_LIBRARY_PATH env variable like below, but unfortunately, this did not work for me.
export LD_LIBRARY_PATH=/usr/local/cuda-12.1/extras/CUPTI/lib64/:$LD_LIBRARY_PATH
2. PyTorch - ImportError: libnccl.so.2: cannot open shared object file: No such file or directory
This is still a PyTorch problem, the output tracktrace is almost the same. This is due to incompatible PyTorch version.
Some recommend to simply downgrade the PyTorch version, or build the PyTorch on your own.
- https://github.com/pytorch/pytorch/issues/88802
- https://discuss.pytorch.org/t/pytorch-for-cuda-12/169447/20?page=2
So what I did was simply downgrading my PyTorch from 2.3.1 to 2.1.1:
python3.11 -m pip install torch-=2.1.1
3. PyTorch - ImportError: .../site-packages/torch/lib/libtorch_cuda.so: undefined symbol: ncclCommRegister
This issue arrived when I tried to downgrade PyTorch from 2.3.1 to 2.3.0. This is due to incompatible PyTorch version.
Traceback (most recent call last):
  File "/usr/local/lib/python3.11/site-packages/langchain_huggingface/embeddings/huggingface.py", line 53, in __init__
    import sentence_transformers  # type: ignore[import]
    ^^^^^^^^^^^^^^^^^^^^^^^^^^^^
  File "/usr/local/lib/python3.11/site-packages/sentence_transformers/__init__.py", line 7, in <module>
    from sentence_transformers.cross_encoder.CrossEncoder import CrossEncoder
  File "/usr/local/lib/python3.11/site-packages/sentence_transformers/cross_encoder/__init__.py", line 1, in <module>
    from .CrossEncoder import CrossEncoder
  File "/usr/local/lib/python3.11/site-packages/sentence_transformers/cross_encoder/CrossEncoder.py", line 7, in <module>
    import torch
  File "/usr/local/lib64/python3.11/site-packages/torch/__init__.py", line 237, in <module>
    from torch._C import *  # noqa: F403
    ^^^^^^^^^^^^^^^^^^^^^^
ImportError: /usr/local/lib64/python3.11/site-packages/torch/lib/libtorch_cuda.so: undefined symbol: ncclCommRegister
The way you fix the problem is the same as the issue 2: downgrading your PyTorch to an older version like 2.1.1.
4. HuggingFace Connectivity Issue.
If you are from countries where HuggingFace is not really accesible. You can set HF_ENDPOINT environment variable to a mirror repo that is accessible from your country.
E.g.,
export HF_ENDPOINT=https://hf-mirror.com
Conceptual Guide
TODO:
Conversational RAG
Conversational RAG maintains history of conversation.
TODO: How to remmeber the chat history
Terminology
HF Format: Hugging Face Format